Powered By Blogger

Saturday, August 31, 2013

Mochi Ice Cream Recipe

INGREDIENTS:
 Sweet rice powder 50g (Glutinous Rice Flour)
Sugar 100g
Water 100ml
Ice cream 150-200g
Cornstarch as needed

1 spread cornstarch onto a cutting board (use plenty so the mochi dough does not stick to the cutting board)
How To Make Japanese Mochi Ice Cream Recipe step 1
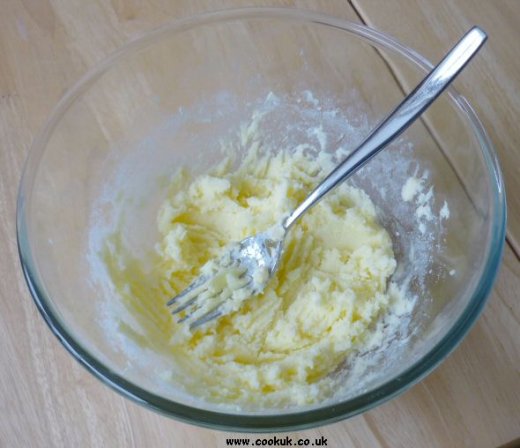
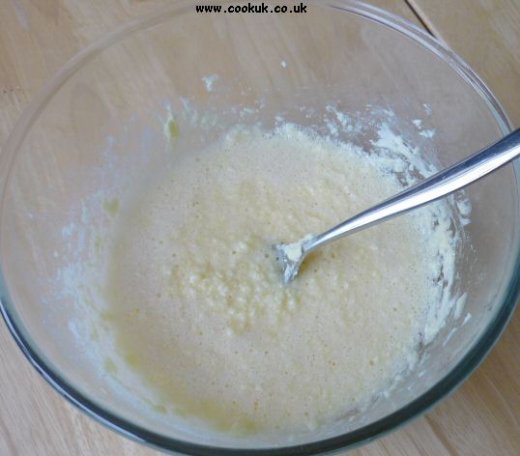
2 Place the sweet rice powder into a bowl, glass is best, and add the water little at a time until it is mixed well. Then add the sugar and mix it well again.
how to make Japanese Mochi Ice Cream Recipe step 2
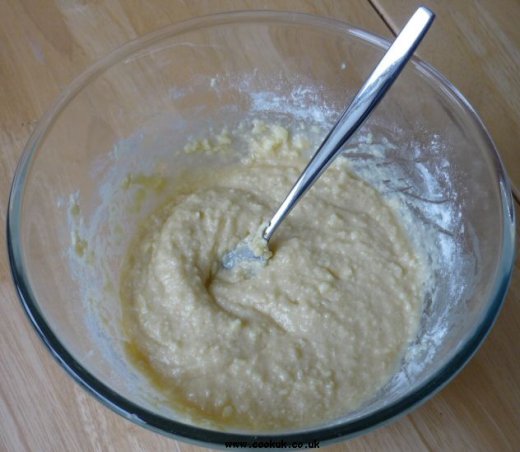
3 Next, cover the bowl with plastic food wrap (leave a breather gap) and cook in the microwave - medium for 2 minutes. Mix with a wooden spoon (dip it in water) and cook for around one more minute.

how to make Japanese Mochi Ice Cream Recipe step 3  
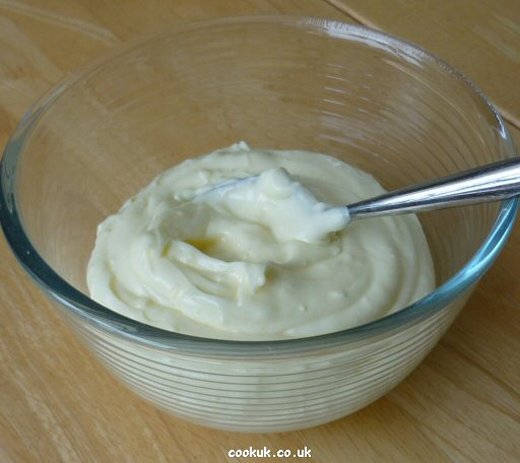
4 You can tell the dough is ready when it turns shiny and smooth.
make Japanese Mochi Ice Cream Recipe at home step 4
5 Dip your spoon in water then spread the sweet rice dough onto the cutting board as flat as possible. Remember the dough is hot so take care.
how to make Japanese Mochi Ice Cream Recipe step 5
6 Cover the dough with corn starch and then flip it over. Then pull and stretch the edges and make the dough thinner.

how to make Japanese Mochi Ice Cream at home Recipe step 6
7 Keep pulling and stretching until the dough is around 2 or 3 millimetres thin.

Japanese Mochi Ice Cream Recipe step 7
8 Leave to cool a little and when the dough is cool enough, cut it into rounds , use a bowl for the size.

make Japanese Mochi Ice Cream Recipe step 8
9 You are left with nice round mochi sheets.

Japanese Mochi Ice Cream Recipe step 9
10 To freeze the dough, cover each layer of mochi sheet with plastic wrap and dusted with cornstarch then put it into the freezer.
how to cook Japanese Mochi Ice Cream Recipe step 10
11 Put the ice cream onto the centre of the mochi sheet. For a nice round mochi use an ice cream scoop. Mmm, strawberry.

Japanese Mochi Ice Cream Recipe step 11
12 Fold and join the edges and then back in the freezer until it’s eating time!

how to make Japanese Mochi Ice Cream Recipe step 12 
This is how your mochi ice cream should look, Strawberry and Green Tea Mochi. It's best to eat these when they're slightly thawed, or else it's like biting into a little ball of rock and we all know that would be no fun:)

Japanese Mochi Ice Cream Recipe step 13 
TIP, you can use a mochi ice cream container ( the tray from mochi you have bought in a store) to help form the shape .

Japanese Mochi Ice Cream Recipe step 14 Japanese Mochi Ice Cream Recipe step 15

Saturday, August 24, 2013

Rolled Marshmallow Fondant by; Wilton Recipe


Chocolate Chip Frosting for Cupcake


Prep time: 
Cook time: 
Total time: 
Serves: 18
 
Ingredients
  • ½ cup butter, softened at room temperature, cut into cubes
  • 4-1/2 cups confectioners’ sugar
  • 4 tablespoons milk
  • 1-1/2 teaspoons vanilla extract
  • ¼ cup baking cocoa
  • ½ shortening
Instructions
  1. Add in cream butter, shortening, cocoa, milk, vanilla and confectioners’ sugar into mixing bowl.
  2. Beating the mixture just until creamy and smooth.
  3. Spread over the frosting over the cooled cupcakes.
  4. Tips:
  5. Decorate each cupcake with semisweet chocolate chips.

White Meringue Frosting for Cupcake

Ingredients
  • ½ cup granulated white sugar
  • 2 tbsp granulated white sugar (to combined with eggs)
  • 3 large egg whites
  • ¼ tsp lemon juice
  • ¼ tsp vanilla extract
  • ¼ tsp cream of tartar
Instructions
  1. Melt the sugar and water in a small pot. Set aside to cool it a bit.
  2. Use a saucepan fill with 3 cups of water and heat it reached 70-75C. Place the a mixing bowl to saucepan. The mixing bowl is rest in saucepan without touching the bottom of saucepan.
  3. Whip egg white in a mixing bowl until frothy. Add in cream of vanilla extract, tartar and sugar. Continue whipping until glossy peak form.
  4. Pour in sugar syrup into the mixing bowl. Continue whip the frosting until thick and fluffy.
  5. Note: use large piping tip for creating great cupcake swirl onto cupcake.

Chocolate Ganache Frosting for Cupcake


Prep time: 
Cook time: 
Total time: 
Serves: 
 
Ingredients
  • 1 cup heavy cream
  • 10 ounces semi-sweet chocolate (fine chopped)
Instructions
  1. Pour heavy cream saucepan.
  2. Heat the heavy cream until start boiling.
  3. Turn down heat to simmer gently.
  4. Add chopped chocolate into hot heavy cream.
  5. Stir often until chocolate completely melt and mixed well with heavy cream
  6. Set aside to cool it or stored into fridge for few minutes, this will make the frosting thicker spread it on top of cupcakes

Sunday, August 18, 2013

Cream Cheese Frosting By: Cookuk.co.uk

KEY POINTS
 Pre-cooking Time:  15 minutes  Cooking Time:
  None
 How Difficult  Easy  Freeze?   No

 Servings
 15 toppings

INGREDIENTS
Make sure the cream cheese and butter are at room temperature before using them in this recipe.
COOK'S NOTES
Mixing the ingredients requires a food blender unless the butter and cream cheese are at warm room temperature. Even then, mixing by hand is hard work.
 *Beware the icing sugar! It gets everywhere.

 Ingredients
Metric
Imperial
USA
 Cream Cheese 250 grams 9 oz Heaped cup
 Butter 150 grams 5 oz ∕ cup
 Icing (confectioners) sugar 400 grams 14 oz 3∕ cups
 Vanilla essence ½ teaspoon
 Food colouring Optional, see Cook's Notes above


 PREPARATION
Add all the ingredients to the food mixer bowl and blend at full speed for 30 seconds. That's it!Spread the icing over the cup cake. For the final smoothing use a knife warmed in hot water to obtain a smooth finish.

Cream cheese topping decorated Decorate with whatever takes your fancy. We sprinkled a few chocolate pieces over the cream cheese topping and then crowned the creation with a Love Heart sweet.

Easy Cupcake Recipe with Cream Cheese Frosting By: cookuk.co.uk

KEY POINTS
 Pre-cooking Time:  15 minutes  Cooking Time:
  18 mins
 How Difficult  Easy  Freeze?   No

 Servings
 6 large, 12 small

INGREDIENTS
The tastiest cupcakes use butter rather than soft margarine. Both produce good results but the butter ones are noticeably tastier.
If you are using butter, as we recommend, then it will need to be at room temperature before mixing. So before you do anything else, get the butter out of the fridge, chop it up into slices on a plate and leave in a warmish room for 15 to 20 minutes.
The reason for the butter being at room temperature is that it is then easier to mix with the other ingredients. Using refrigerated butter will make the mixing very hard work.
All of the amounts in these cupcake recipes are critical.
 Ingredients
Metric
Imperial
USA
 Unsalted butter (see
 ingredients paragraph above)

110 grams 4 oz ½ cup
 Caster sugar (superfine) 110 grams 4 oz heaped ½ cup
 Self-raising flour 110 grams 4 oz a little less than 1 cup
 Eggs 2 medium-sized
 Milk (semi-skimmed or full fat) 2 tablespoons
 Vanilla extract ¼ teaspoon
WHAT SPECIAL KITCHEN EQUIPMENT?
Cupcake containers
. Use standard cupcake or muffin sized cake containers. The foil ones are best because they provide good support but the paper ones also do a good job. They are available in most supermarkets.
Small cake / muffin cake tins. It's not necessary to use these cake tins but they do support the paper cases very well, producing nicely shaped cupcakes. See the paragraph below for more details
Most recipes for cupcakes say to add the mixture to cupcake containers and then bake for 15 to 20 minutes. But there are a whole variety of cake / muffin containers and they give significantly different results. To avoid cluttering up this recipe, the various pros and cons of the different containers are discussed here.

CLICK ANY PICTURE ON THIS PAGE TO ENLARGE IT
PREPARATION
Butter and sugar being mixed in a bowl Preheat the oven to 180°C / 350°F / Gas 4.Use a fork to mash up the butter until it softens a bit more. This will take two or three minutes.
Add the sugar to the butter and mix it in well until both ingredients are combined. It takes a couple of minutes.

Eggs added to the mixture Break the eggs into a bowl and mix them lightly with a fork until the whites and yolks are combined.Pour about a third of the whisked eggs into the butter and sugar mixture and mix well. Add the next third of the eggs, mix well and then do the same for the remaining third of the eggs. Finish off mixing with a wooden spoon to remove all the larger lumps.

The mixture with the flour added. Now add the milk and vanilla essence to the mixture and mix well for 30 seconds or so. Don't worry about the smallish lumps in the mixture.Fold in the flower to the mixture and gently mix it in until all the ingredients are combined well.

Spoon the mixture into the cup cake containers, filling each to about two thirds full. Use a teaspoon for this and drop the mixture into the centre of the cup to avoid leaving bits around the edge. Leave the cupcakes for about five minutes to allow the mixture to settle evenly.
If using a flat baking tray, ensure the cakes are kept well apart. Place in the preheated oven and bake for about 15 to 20 minutes.

Note: if you are cooking tiny sweet cup cakes (see pictures at end of article), the cooking time is about 12 to 14 minutes.

Cooking time varies on the size of the cupcake. The smaller the cupcake the shorter the cooking time. They are ready when the top is a light golden brown. Their tops will spring back when lightly pressed. Another way to test if they are cooked is to insert a narrow metal spike into the middle. If it comes out "clean", the cakes are done.
Take the cupcakes from the oven and leave to cool for 20 minutes before decorating.

Saturday, August 17, 2013

No Bake "Banana Split Cake" by: Snack Works

Banana Split "Cake" Recipe 

Ingredients

  • 9 HONEY MAID Honey Grahams, crushed (about 1-1/2 cups)
  • 1 cup sugar, divided
  • 1/3 cup butter, melted
  • 2 pkg. (8 oz. each) brick cream cheese, softened
  • 1 can (20 oz.) crushed pineapple in juice, drained
  • 6 bananas, divided
  • 2 pkg. (3.4 oz. each) JELL-O Vanilla Flavor Instant Pudding
  • 2 cups cold milk
  • 2 cups thawed COOL WHIP Whipped Topping, divided
  • 1 cup chopped pecans


Instructions:

Mix  crumbs, 1/4 cup sugar and butter; press onto bottom of 13x9-inch pan. Freeze 10 min.
Beat  cream cheese and remaining sugar with mixer until well blended. Spread carefully over crust; top with pineapple. Slice 4 bananas; arrange over pineapple.
Beat  pudding mixes and milk with whisk 2 min. until well blended. Stir in 1 cup COOL WHIP; spread over banana layer in pan. Top with remaining COOL WHIP. Refrigerate 5 hours. Slice remaining 2 bananas just before serving; arrange over dessert. Top with nuts.


Recipe Tips

Size-Wise This banana split-inspired dessert makes a great treat to share with friends and family.

Shortcut Substitute 1-1/2 cups HONEY MAID Graham Cracker Crumbs for the crushed grahams.

Variation Omit nuts. Garnish with chocolate curls. To make curls, warm 1 oz. chocolate by microwaving it on HIGH for a few seconds or just until you can smudge the chocolate with your thumb. Hold the piece steadily and draw a vegetable peeler slowly over flat bottom of chocolate, allowing a thin layer to curl as it is peeled off the bottom of the chocolate piece to make long, delicate curls. Or to make shorter curls, use the same technique using the narrow side of the chocolate piece.
 

Friday, August 16, 2013

Cheesecake Bars By: Bakerella!

IMG_3843 
Crust
1 1/2 cups crushed Biscoff Cookies (about 27 cookies)*
(also try Graham)
3 Tablespoons packed brown sugar
6 Tablespoons melted butter
  • Mix cookies and sugar together.
  • Add butter and stir until combined.
  • Press mixture into a 13 X 9 pan.

Cheesecake
3 (8 oz.) packages cream cheese, softened
1 cup sugar
2 Tablespoons flour
3 eggs
8 oz. sour cream
1 Tablespoon vanilla
  • Preheat oven to 325 degrees.
  • Cream the sugar, cream cheese, and flour with an electric mixer on medium until light and fluffy.
  • On medium low, add eggs one at a time, mixing well with each addition.
  • Add sour cream and vanilla and mix until just combined.
  • Pour on prepared crust and bake for about 45 minutes.
  • Remove and cool.
  • Prepare ganache.

Chocolate Ganache
8 oz. heavy whipping cream
2 oz. butter
8 oz semi-sweet chocolate
1/4 cup confectioners’ sugar
  • Heat cream and butter on stove until just before boiling.
  • Remove from stove and pour over chocolate. Stir until completely combined.
  • Add confectioners’ sugar and beat with a wire whisk until combined and smooth.
  • Pour over cooled cheesecake.
  • Cover and refrigerate overnight.
  • Cut into bars and serve.

IMG_3766 

#more recipe here > www.bakerella.com

RED VELVET CAKE BALLS By: Bakerella!

Red Velvet Cake Balls 
Ingredients:
1 box red velvet cake mix (cook as directed on box for 13 X 9 cake)
1 can cream cheese frosting (16 oz.)
1 package chocolate bark (regular or white chocolate)
wax paper

Procedure:
1. After cake is cooked and cooled completely, crumble into large bowl.
2. Mix thoroughly with 1 can cream cheese frosting. (It may be easier to use fingers to mix together, but be warned it will get messy.)
3. Roll mixture into quarter size balls and lay on cookie sheet. (Should make 45-50. You can get even more if you use a mini ice cream scooper, but I like to hand roll them.)
4. Chill for several hours. (You can speed this up by putting in the freezer.)
5. Melt chocolate in microwave per directions on package.
6. Roll balls in chocolate and lay on wax paper until firm. (Use a spoon to dip and roll in chocolate and then tap off extra.)

YuMMy Tips:
I also only melt a few pieces of chocolate bark at a time because it starts to cool and thicken. It’s easier to work with when it’s hot.

 #more wonderful recipe here > http://www.bakerella.com

Thursday, August 15, 2013

Red Velvet Cake by: MAYA Kitchen

 Frontpage pic

Ingredients:
1 pack MAYA Decadence Yellow Cake Mix 520g
2 tablespoons cocoa powder
2 teaspoonsred food color
1 cup+2 tablespoonswater
3 pieces eggs, separated
1/3 cup vegetable oil


Frosting:
1 bar cream cheese, softened
3/4 cup all purpose cream, chilled & whipped
3/4 cup powdered sugar
1 teaspoon  vanilla


Procedure:
Preheat oven to 350 F/177 C. Grease and line five 4–inch heart shaped pans.

 
Mix yellow cake mix, cocoa powder, red food color, water and egg yolk. Set aside. In another bowl, beat egg whites until stiff. Fold in the cake batter mixture into the egg whites until well blended. Divide batter into pans. Bake for 30–35 minutes or until done. Set aside to cool. 

 
To Prepare Frosting: In a bowl, soften cream cheese and slowly add powdered sugar blend until smooth. Add vanilla.  Fold in whipped cream. Get one heart cake and crumble to form coarse crumbs. Set aside. 

 
To Assemble: Place remaining 4 cakes into cake platters and cover with cream cheese frosting. Cover fully the frosted cake with the cake crumbs and serve.

 
Yield: 4 pieces

Easy Choco Chip Cookies by: Maya Kitchen

Frontpage pic


 Ingredients:


1/2 cup butter
1 cup packed brown sugar
1 pack MAYA Complete Hotcake Mix 200g
4 tablespoons semi–sweet chocolate, finely chopped
4 tablespoons cashew nuts, finely chopped


Procedure:

Preheat oven to 375 degrees F. Cream butter until smooth. Add sugar and continue beating until mixed together. Stir in hotcake mix and beat until blended. Fold in semi–sweet chocolate and cashew nuts. Roll the cookie dough to approximate 3 x 6–inch thick cylinder and cut into 12 pieces. Place on a greased cookie sheet. Bake for about 10 minutes. Remove from pan and let it cool.

Choco Chip Cookies!


Ingredients:

3 cups (13½ ounces) bread flour
1 teaspoon baking powder
¼ teaspoon baking soda
¾ teaspoon kosher salt
1 cup unsalted butter, cold and cut into cubes
¾ cup + 4 teaspoons (6 ounces) light or dark brown sugar
½ cup granulated sugar
2 eggs, cold, lightly beaten in a separate bowl
1 teaspoon vanilla extract
1½ cups dark chocolate chips
1 cup walnuts, toasted and coarsely chopped


Directions:

1. Line a baking sheet with parchment paper; set aside.

2. In a medium bowl, whisk together the flour, baking powder, baking soda and salt; set aside.

3. Using an electric mixer, beat the butter on medium speed until it comes together in one cohesive mass, about 1 minute. Add both sugars and continue to beat for another 1 to 2 minutes, until all of the sugar has been incorporated into the butter. Gradually add the eggs and vanilla and continue beating on medium speed until mixed, scraping the sides of bowl once (the batter will appear lumpy). Reduce the speed to medium-low and gradually add the flour mixture until just a little bit of flour still remains. Stir in the chocolate chips and nuts with a rubber spatula.

4. Divide the dough into 12 even pieces, just grabbing it by the handful and roughly shaping it into a ball (it should not be smooth). Place them (evenly spaced) on the prepared baking sheet. Refrigerate for 30 minutes.

5. Preheat oven to 375 degrees F. Bake for 18 to 24 minutes, or until light golden brown on top. Let cool for 5 minutes on the cookie sheet, then remove to a wire rack to finish cooling. Leftovers can be stored in an airtight container at room temperature for up to 4 days.

#MORE UMMY RECIPE HERE >  http://www.browneyedbaker.com

Chocolate Bundt Cake with Chocolate Fudge Icing!

Chocolate Bundt Cake with Chocolate Fudge Icing 


Ingredients:

For the Cake:
1 tablespoon butter, melted
1 tablespoon cocoa powder
¾ cup natural unsweetened cocoa powder
6 ounces bittersweet chocolate (60% cacao), finely chopped
1 teaspoon instant espresso powder (optional)
¾ cup boiling water
1 cup sour cream, at room temperature
1¾ cups all-purpose flour
1 teaspoon baking soda
1 teaspoon salt
¾ cup unsalted butter, at room temperature
2 cups light brown sugar
1 tablespoon vanilla extract
5 eggs, at room temperature

For the Icing:
½ cup unsalted butter
½ cup cocoa powder
6 tablespoons evaporated milk
3¾ cups powdered sugar
1 teaspoon vanilla extract
¼ teaspoon salt


Directions:

(Cake)

1.  Stir together the 1 tablespoon melted butter and 1 tablespoon cocoa powder until fully dissolved. Using a pastry brush, coat the entire interior of a standard 12-cup Bundt pan; set aside.
2. Adjust oven rack to lower-middle position and preheat oven to 350 degrees F.
3. Stir together the cocoa powder, chopped chocolate and espresso powder in a medium heatproof bowl. Pour the boiling water over the mixture and whisk until everything is completely melted and smooth. Set aside to cool to room temperature, then whisk in the sour cream. In a separate medium bowl, whisk together the flour, baking soda and salt.
4. Using an electric mixer, beat the butter, sugar and vanilla on medium-high speed until light and fluffy, about 3 minutes. Reduce the speed to medium and add the eggs one at a time, beating well between each addition and scraping the sides of the bowl as needed. Reduce the speed to medium-low and add one-third of the flour mixture and half of the chocolate mixture and mix until just incorporated. Scrape the sides of the bowl and repeat with half of the remaining flour mixture and the rest of the chocolate mixture. Finally, add the last of the flour mixture and beat until just incorporated. Scrape the sides and bottom of the bowl and beat on medium-low for 30 seconds to thoroughly combine the batter.
5. Pour the batter into the prepared Bundt pan and bake until a skewer inserted into the center of the cake comes out with just a few crumbs attached, 45 to 50 minutes. Place the pan on a wire cooling rack for 10 minutes, then turn the cake out onto the cooling rack and cool to room temperature, about 3 hours. 

 (icing)

6. In a medium saucepan set over medium-high heat, bring the butter, cocoa powder and evaporated milk to a boil, whisking occasionally. Add the powdered sugar, vanilla extract and salt and whisk continuously until the mixture becomes smooth, about 30 seconds.
7. Immediately remove the pan from the heat and pour the icing over the top of the cake, allowing it to drip down the sides. (The icing will begin to harden quickly after it is removed from the heat, so it's important to work quickly with it.)
8. The cake can be stored in an airtight container or wrapped with plastic wrap at room temperature for up to 3 days.


#for more recipe, visit >  http://www.browneyedbaker.com

Friday, August 9, 2013

Gluten-Free Blueberry Cupcakes

healthy? or no-no? i want blueberry cupcake!!!!


Prep time:
10 min
Cook time:
30 min
Serves:
Makes approx 12
Ingredients
150g ground almonds
150g unsalted butter
150g icing sugar
100g gluten-free plain flour
5 medium egg whites/10 tbsp of liquid egg white
200g punnet of blueberries
Zest of 1 lemon
60ml creme fraiche
Method
1. Preheat the oven to 180°C/350°F/Gas Mark 4 and line the a 12-hole muffin tin with cupcake cases.
2. Melt the butter in the microwave for about a minute and leave to one side to cool. Sift the flour, icing sugar and almonds into a large bowl and add the lemon zest.
3. Whisk the egg whites until frothy and add to the flour, sugar and almond, then stir in the cooled melted butter.
4. Fold the blueberries into the mixture, reserving a few for decoration.
5. Divide the mix between the cases and bake for 25-30 minutes depending on your oven.
6. Test the cupcakes by inserting a toothpick to see if they are baked, if the toothpick comes out clean and they are golden on top, they are ready. Cool in the tins for 5-10 minutes then cool completely on a wire rack. Serve with a dollop of crème fraiche and top with a couple of blueberries.

here's the site of this wonderful recipe >>>  http://www.cupcakes.co.uk/gluten-free-blueberry-cupcakes

Carrot Cupcake

My Fave Carrot Cupcake recipe... just wanted to share dis one...i can eat half a dozen of dis in one seating.nyahahahaha.....

Carrot cupcakes recipe

Ingredients

For the cupcakes
For the frosting
  • 170 g thick cream cheese
  • 65 g butter
  • 125 g icing sugar
  • 1/2 lemon, finely grated zest only
  • 3/4 tbsp soured cream
  • 1/2 tsp vanilla extract

Method

1. For the cupcakes: preheat the oven to 180C/160C fan/gas 4 and line a cupcake pan or muffin tin with paper cases.

2. Sift together the flour, bicarbonate of soda, baking powder, cinnamon and ½ tsp salt and set aside.

3. In a large bowl, whisk together the sugar and eggs until thick and creamy. Slowly add the oil in a thin stream while whisking constantly. Fold in the dry ingredients, and once combined gently stir in the nuts and carrots.

4. Divide the batter evenly among the paper cups and bake for 20-25 minutes, or until a skewer inserted in the centre of one cupcake comes out clean. Place on a wire rack to cool.

5. For the frosting: in a large bowl, beat together the cream cheese, butter, and icing sugar until the mixture is smooth and soft. Stir in the lemon zest, soured cream and vanilla extract.

6. Pile the frosting into a piping bag and pipe it onto the cooled cupcakes. Decorate with the extra chopped walnuts before serving. 


more cupcake recipe here>>>> http://uktv.co.uk/food/recipe/aid/641774

Friday, August 2, 2013

So Sweet Heart Cupcake


 Igredients:


  •  


Directions:

  1. Preheat an oven to 350 degrees F (175 degrees C). Line a standard muffin tin with paper cupcake liners.
  2. Beat the cake mix, water, vegetable oil, and egg whites together on low speed for 30 seconds, then on medium for 2 minutes, until smooth. Fill cupcake liners 1/3 full with white batter; set aside.
  3. Stir 4 drops of red food coloring into the remaining bowl of batter to make the batter pink, stir in the raspberry oil. Pour 1/3 of pink batter into a resealable plastic bag and set aside.
  4. Mix more food coloring into the remaining bowl of pink batter until it is an orange/red color and pour the batter into a resealable plastic bag. Cut a corner off the bag, stick the open tip into the center of each cup of white batter and squeeze in about two tablespoons of red batter.
  5. Cut the corner off the bag with the pink batter, stick the open tip into the center of the red batter and squeeze about 1 tablespoon pink batter into each cup.
     6   .Bake the layered cupcakes in the preheated oven until a toothpick inserted into the center comes 
           out clean, 15 to 20 minutes. Cool completely before frosting.


Yummy Note:


Bunny Cupcake

i just wanted to share some of my fave cupcakes...

Ingredient:


Directions:

1.  Preheat oven to 350 degrees F (175 degrees C). Line 24 cupcake cups with paper liners.

2.
Whisk flour, sugar, baking powder, and baking soda together in a bowl. Beat buttermilk, vegetable shortening, vanilla extract, and salt into dry ingredients until thoroughly combined; beat egg whites into batter. Pour batter into prepared cupcake cups, filing them 2/3 full.

3. Bake in the preheated oven until cupcakes are lightly browned, about 30 minutes. Let cool.

4.Divide a container of frosting in half and tint half pink with red food coloring; set remaining vanilla frosting aside. Use second frosting container to frost cupcakes. Cover cupcakes with coconut.

5.Break graham crackers into individual cookies and cut each cookie carefully into a leaf shape pointed at both ends to make 48 ears. Cover each ear with remaining white frosting and frost the inside of each ear shape with pink frosting. Stick 2 ears into each cupcake. Push 2 mini chocolate chips into tops of cupcakes below ears to make eyes; add a dot of pink frosting to each for a nose.


A Little Tip:

 
You can also use a box cake recipe. This cuts down on preparation time. Make sure when you cut the graham cracker ears to leave a point at the end to insert in the cupcake. Enjoy!